similar machine for choose
How to test new high frequency welding machine
Notes: Turn on power of high frequency machine without R.F function for 15minutes.
(1) Is it good for increase inside power of RF lamp.
(2) Make the RF lamp keep on better vacuum situation
(3) Good for stable high frequency output function
(4) Help to increase of service life of high frequency lamp
Step1: Test machine on the manual situation, without R.F function
(1).“Power SW”–on; “Manual/Auto”–manual; “H.F SW”–OFF
(2).Press “manual up” red button(mold goes up) and place pvc welding material
(3).Press ”manual down” green button (welding horn goes down) and press pvc material fasten.
(4).If mold can not press welding material balance&fasten
adjust the screws and make sure mold is horizontal.
(5).Setting the timers
(relay time, welding time, cooling time, as the beginning is can be 2s-8s-2s or customized)
(6).Press “R.F start” yellow button to start testing welding.
(7).Clock-wise rotating R.F adjustment by left hand and watch the R.F meter by eye.
As there is not R.F current, so the needle inside the R.F meter is no move.(just pretend it is move)
(8).Press “manual up”-about 14s( 2s+8s+2s) after welding mold press material.
T he pointer/needle inside meter already goes down automatically, and the welding process finish auto.
(9).Manual testing can be finish.
if all the action is finish well. Go to step 2; If not, adjust machine& make test again.
Step2:Test machine on automatic situation without RF function.
(1).Mold should be on the high position at the beginning. It is touch the table, press”manual up” to raise mold.
(2).“Power SW”–on; “Manual/Auto”–Auto; “H.F SW”–OFF
(3).Press ”manual down” green button. Welding action from (4)-(9) upper will finish automatically
By the way, press pedal by foot can do the same job as hand push “manual down” Button.
If the moving action can be finish as plan, the manual and auto test without R.F function can be finish.
Step3: Test machine on the manual situation, with R.F function
(1).“Power SW”–on; “Manual/Auto”–manual; “H.F SW”-ON
(2).Press “manual up” red button(mold goes up) and place pvc welding material
(3).Press ”manual down” green button (welding horn goes down) and press pvc material fasten.
(4).If mold can not press welding material balance&fasten
adjust the screws and make sure mold is horizontal.
(5).Setting the timers
(relay time, welding time, cooling time, as the beginning is can be 2s-8s-2s or customized)
(6).Press “R.F start” yellow button to start testing welding.
(7).Clock-wise rotating R.F adjustment by left hand and watch the R.F meter by eye.
Make sure the pointer inside the R.F meter rise from “0” slowly.
( if welding 2 layers, pointer goes up to 7-9/ if welding 4 layers, pointer goes up to 12-14)
(8).Press “manual up”-about 14s( 2s+8s+2s) after welding mold press material.
T he pointer/needle inside meter already goes down automatically, and the welding process finish auto.
(9).Manual testing can be finish
if welding result is good as plan, go to step 4 below; If not, adjust machine and make test again.
Step4: Test machine on automatic situation with RF function.
(1).Mold should be on the high position at the beginning.
It is touch the table, press”manual up” to raise mold.
(2).“Power SW”–on; “Manual/Auto”–Auto; “H.F SW”–ON
(3).Press ”manual down” green button. Welding action from (4)-(9) upper will finish automatically
Make sure the pointer inside the R.F meter rise from “0” slowly.
( if welding 2 layers, pointer goes up to 7-9/ if welding 4 layers, pointer goes up to 12-14)
By the way, press pedal by foot can do the same job as hand push “manual down” Button.
if welding result is good as plan. Go to step 5; If not, adjust machine and make test again
Step5: after automatic R.F function finish and welding result is good.
Take a records of time setting and current and mass productivity can start.
If the testing result is not good enough, check the reason, reset machine and test again
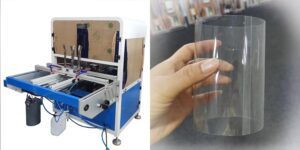
candy round tube box machine working manual part 1
economic design manual plastic Pvc tube boxes machine working manual part 1
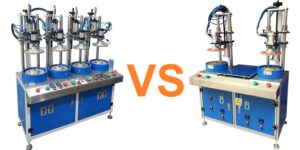
Choose Pvc tube boxes machine margin curling JC-2012A-2H/4H
How to choose the suitable multi-heads Pvc tube boxes machine for plastic cylinder tubes container side crimping